I’m using Weblogic 10.3.4

Run it from “yourdomain/bin” like this :

./startWeblogic.sh -Dweblogic.management.username=username -Dweblogic.management.password=password   -Dweblogic.system.StoreBootIdentity=true

It will generate a login file in “yourdomain/servers/AdminServer/security” named boot.properties which contain your login.

The next time you start the weblogic, you don’t have to do any user & password prompt as long as the boot.properties file exists in the directory mentioned above.


For complete documentation, check this oracle link : http://docs.oracle.com/cd/E13222_01/wls/docs70/adminguide/startstop.html#1178534

(English version is below the Indonesian version).

Untuk uninstall DB2 V9.5, ada beberapa langkah yang harus dijalankan :
1. Lihat instance apa saja yang sedang berjalan
a. gunakan user root
b. masuk ke DB2DIR (tempat instalasi DB2, defaultnya di “/opt/IBM/db2/V9.5/)
c. masuk ke folder bin (cd bin)
d. Jalankan command “./db2ilist”
e. Akan muncul list instance yang ada (misalnya “db2inst1”). Ingat – ingat atau catat instance yang ada.

2. Matikan instance
Untuk tiap instance yang ada :
a. login sebagai owner instance
b. ketikkan “db2stop force” enter
c. ketikan “db2 terminate” enter untuk memastikan instance benar-benar mati

3. Matikan Database Administration Server (DAS)
a. Login sebagai DAS (biasanya dasusr1)
b. ketik “db2admin stop” enter untuk menghentikan server

4. Drop instance
a. login sebagai root, masuk ke DB2DIR, folder instance
b. untuk setiap instance yang ada, ketik “./db2idrop ” enter

5. Drop DAS
a. login sebagai root, masuk ke DB2DIR, folder instance
b. ketik “./dasdrop” enter untuk menghapus DAS

6. Uninstall
a. login sebagai root, masuk ke DB2DIR, folder install
b. ketik “db2_deinstall -a”, enter


To uninstall DB2 V9.5 in AIX, follow these steps :
1. Check for existing instances
a. login as root
b. go to DB2DIR (Where DB2 installed, by default it is “/opt/IBM/db2/V9.5/)
c. go to bin folder (cd bin)
d. run “./db2ilist” command
e. There will be list of instances (e.g “db2inst1”).

2. Shutdown instance
For each instance :
a. login as the instance owner
b. run “db2stop force”
c. run “db2 terminate” to ensure the instance has been properly terminated

3. Turn off Database Administration Server (DAS)
a. Login as DAS (commonly named as “dasusr1”)
b. run “db2admin stop” to stop DAS
4. Drop instance
a. login as root, go to DB2DIR, go to instance folder
b. For each existing instance, run “./db2idrop ”

5. Drop DAS
a. login as root, go to DB2DIR, go to instance folder
b. run “./dasdrop”

6. Uninstall
a. login as root, go to DB2DIR, go to install folder
b. run “db2_deinstall -a”

(For english language, see below, I put it after the Indonesian)

Untuk membuat koneksi remote dekstop dari PC Windows ke Linux, salah satu caranya adalah menggunakan program bernama VNC (Virtual Network Computing).

Langkah – langkahnya adalah :
A. Di Windows
1. Download Real VNC di http://realvnc.com
2. Install Real VNC di Windows
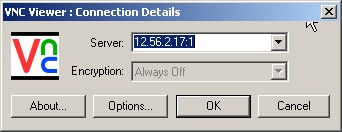
3. Jalankan VNC Viewer (dari start menu -> Programs -> -> VNC Viewer 4 -> Run VNC Viewer
VNC Viewer Screen Caps

B. Di Linux (atau bisa dari Windows, menggunakan putty)
1. login sebagai root
2. ketik command “vncserver”
3. Akan muncul text semacam ini :


New ‘namahostname:1 (root)’ desktop is namahostname:1

Starting applications specified in /root/.vnc/xstartup
Log file is /root/.vnc/namahostname:1.log

perhatikan tulisan ‘namahostname’ yang diikuti dengan angka. Dalam contoh di atas adalah ‘1’. Angka ini adalah index display yang dapat diakses dari komputer lain.

Kembali ke VNC Viewer, ketikkan IP address komputer linux diikuti dengan “:”
Jadi misalkan IP nya 10.0.7.15 dan index display 1, maka tuliskan 10.0.7.15:1 kemudian tekan OK.
Maka remote desktop akan muncul.

Bila ada masalah (display tidak muncul semestinya seperti di Linux), ada kemungkinan, di Linux harus ubah file xstartup (ada di root Linux, sebagai root ketik vi xstartup nanti akan muncul), edit seperti ini :


#!/bin/sh

# Uncomment the following two lines for normal desktop:
unset SESSION_MANAGER
exec /etc/X11/xinit/xinitrc

[ -x /etc/vnc/xstartup ] && exec /etc/vnc/xstartup
[ -r $HOME/.Xresources ] && xrdb $HOME/.Xresources
xsetroot -solid grey
vncconfig -iconic &
xterm -geometry 80×24+10+10 -ls -title “$VNCDESKTOP Desktop” &
startx &


Di baris terakhir (di atas tertulis “startx &”), coba ganti menjadi “startkde &”.
Save file tersebut (kalau Anda tadi memakai vi, tekan Esc kemudian ketik “:x” dan enter) kemudian coba konek lagi dengan VNC Viewer.


To make a remote desktop connection to a Linux OS from Windows OS, one of the ways is to use RealVNC (VNC = Virtual Network Computing).

Steps :
A. In Windows machine
1. Download Real VNC at http://realvnc.com
2. Install Real VNC in Windows
3. Run VNC Viewer (start menu -> Programs -> -> VNC Viewer 4 -> Run VNC Viewer
VNC Viewer Screen Caps

B. In Linux (or you can do it from windows by using “putty” program which available to download for free everywhere)
1. login as root
2. type “vncserver” and press enter
3. There will be such text :


New ‘namahostname:1 (root)’ desktop is namahostname:1

Starting applications specified in /root/.vnc/xstartup
Log file is /root/.vnc/namahostname:1.log

note the word ‘namahostname’ which followed by a number. In the above example, the number is ‘1’. This number is a display index number for accessing display from another computer.

Back to the VNC viewer in Windows, type the Linux machine IP address followed by “:”, for example “10.0.7.15:1” then click “OK”.
Remote desktop should be established.

If the display doesn’t show up, it might needs to change xstartup file (it is in root directory in the Linux machine).
To edit it, type “vi xstartup” after login as root, dan make sure your’e on the root directory. Edit the file to be like this :


#!/bin/sh

# Uncomment the following two lines for normal desktop:
unset SESSION_MANAGER
exec /etc/X11/xinit/xinitrc

[ -x /etc/vnc/xstartup ] && exec /etc/vnc/xstartup
[ -r $HOME/.Xresources ] && xrdb $HOME/.Xresources
xsetroot -solid grey
vncconfig -iconic &
xterm -geometry 80×24+10+10 -ls -title “$VNCDESKTOP Desktop” &
startx &


In the last line, replace “startx &”, to “startkde &”.
Save the (Hit Esc then type “:x” then hit enter) then try to connect again using VNC Viewer.

Sound based search engine

Posted: January 14, 2010 in Idea
Tags: , , , ,

I’m thinking about a search engine that search based on a sound input. For example, if we sing a part of a song to the microphone connected to computer, then the search engine can give us information related with the song we sang such as artist, mp3 file, etc.

I imagine, our voice will be translated into a chart in certain pattern. The pattern then be used to search into the database to find similiar pattern. Ofcourse at first, we have to translate songs / voices into this kind of data (chart).

I even imagine that if we play a guitar cover of a song, then we can find the mp3 file of the song.
Cool huh?

Still trying to find right schedule to start.

Salah satu fungsi yang tidak tersedia di SQL Server 2005 bila dibandingkan MySQL adalah fungsi ‘LIMIT‘.
Fungsi ini berguna untuk membatasi jumlah row yang diambil, dengan batasan awal dan jumlah yang ditentukan dengan parameter.
Contoh :

SELECT * FROM [someTable] LIMIT 1,2 (tidak bekerja di SQL Server 2005, ini hanya bekerja di MySQL)

One of the functions that not provided in SQL Server 2005 if it compared with MySQL is ‘LIMIT‘ function.
The function used for limiting amount of row being returned from a ‘select query’, by inputing parameters of beginning index as first cursor, and amount of rows to be returned.
e.g :

SELECT * FROM [someTable] LIMIT 1,2 (it doesn’t work in SQL Server 2005, it’s MySQL query)


Untuk melakukan paging di SQL Server 2005, seperti LIMIT pada MySQL, gunakan query berikut, menggunakan fungsi ROW_NUMBER(). (catatan : ketika diketik di query sheet, tulisan ROW_NUMBER() memang tidak akan berubah warna menjadi biru seperti kebanyakan fungsi-fungsi bawaan SQL SERVER, tapi ini berhasil) :

SELECT * FROM (SELECT [field1], [field2], [field3], ROW_NUMBER() OVER(ORDER BY [field1] ) AS rownum FROM [tableName] WHERE [conditional statement]) AS something WHERE rownum BETWEEN [start integer] AND [end integer]

ROW_NUMBER() menciptakan nomor yang berurutan, mengurutkan field yang disebutkan pada parameter fungsi OVER(), mengurutkannya dari nomor 1 sampai row terakhir dari field.

Despite that, we can still be able to do paging in SQL Server by using ‘ROW_NUMBER()’ function. (note : when we type ‘ROW_NUMBER()’ in a query sheet, the string won’t turn it’s color to blue or red like most of functions in SQL Server 2005, but it works).

SELECT * FROM (SELECT [field1], [field2], [field3], ROW_NUMBER() OVER(ORDER BY [field1] ) AS rownum FROM [tableName] WHERE [conditional statement]) AS something WHERE rownum BETWEEN [start integer] AND [end integer]

ROW_NUMBER() creates a series of number, indexing field mentioned in OVER() function as a parameter (in the query above, [field1] were set as the indexed field)

Untuk membuat background object shockwave menjadi transparan di html,
gunakan variable “wmode” dan diset value nya “transparent”

misal :
<object align=”middle” width=”100″ height=”60″><param name=”movie” value=”namafile.swf”/><param name=”quality” value=”high”/><param name=”wmode” value=”transparent“/><embed wmode=”transparent” src=”namafile.swf” quality=”high” pluginspage=”http://www.macromedia.com/go/getflashplayer&#8221; type=”application/x-shockwave-flash” width=”100″ height=”60″></embed></object>


To show transparent shockwave flash object on HTML,
use the “wmode” variable, set it’s value to “transparent”

e.g :
<object align=”middle” width=”100″ height=”60″><param name=”movie” value=”filename.swf”/><param name=”quality” value=”high”/><param name=”wmode” value=”transparent“/><embed wmode=”transparent” src=”filename.swf” quality=”high” pluginspage=”http://www.macromedia.com/go/getflashplayer&#8221; type=”application/x-shockwave-flash” width=”100″ height=”60″></embed></object>

Kompresi SMS

Posted: July 27, 2008 in J2ME
Tags: , , , , ,

Januari lalu aku berhasil bikin program buat kompresi SMS.
Intinya sih, SMS yang aslinya cuma muat 160 karakter tiap SMS,
bisa jadi lebih dari 200 karakter.

Last January, I’ve managed to build an SMS Compressor for mobile phones
While normal SMS contains up to 160 characters per package, compressed one can contain more than 200 characters.

Klo sekarang, cocok banget dipake sama kartu esia yang bayar SMS nya per karakter,
karena di programku karakternya dikompres.
Aku bikin pake J2ME.
Btw, terakhir ngecek di getjar.com sama googling, programku ini bisa ngompres paling tinggi dibanding program2 laen yang ada. Tapi tu Februari 2008 klo gak salah, ato Maret gitu.
Programku kerjanya bukan lewat GPRS.. tapi tetep jaringan GSM/CDMA, jadi SMS tu bisa pending (in case hape tujuan lagi diluar area ato mati)

Last time I checked it (around February-March 2008), this program got the highest compression result, when I compared it with another similiar programs at that time.
My program uses GSM/CDMA network, and not using GPRS. It still allows SMSes to pending.

Konsepnya simpel.
Untuk kompresi, misal ada tulisan “mengambil”

Tulisan itu dipisah-pisah dulu, trus dijadiin biner :

The concept is simple.
Let’s put down a string of “mengambil” as a sample.
It then will be separated and converted into binary :

Huruf Heksadesimal (berdasar ASCII) Biner
m 6D 01101101
e 65 01100101
n 6E 01101110
g 67 01100111
a 61 01100001
m 6D 01101101
b 62 01100010
i 69 01101001
l 6C 01101100

nah, dari tabel di atas bisa dilihat bahwa ada kesamaan bit biner yang berulang toh.
(yang warnanya merah)..

We can see from the table above, that there are many similiar bits (the red ones)

Berdasarkan itu, aku potong bagian-bagian yang sama, terus aku sisakan satu aja di awal untaian binernya :

Based on that, I cut the same bits but one I put it in front of the new binary string :

01101101
01011110
01110001
11010010
10011100

Trus untuk menandai saat proses dekripsi, maka aku tambahkan byte penanda sapaya ngerti bagian mana yang nanti kudu didekrip :

Then, to mark the string for decompressing process, I add a sign byte :

11111111 (byte penanda awal / begin sign byte)
01101101
01011110
01110001
11010010
10011100
11111111 (byte penanda akhir / end sign byte)

nah.. sekarang kita bandingkan. “mengambil” terdiri dari 9 karakter. 1 karakter = 1 byte = 8 bit.
Bandingkan dengan hasil kompresinya (di atas).. cuma ada 7 untaian 8 bit = 7 karakter.
Dan semakin panjang untai awal, kompresi yang dilakukan bisa makin besar.

Now e can compare. “mengambil” contained 9 characters. 1 chars = 1 byte = 8 bit.
Compare with the compression result : there are only 7 byte = 7 char.
And so the longer string, the higher compression rate can be done.

Itu namanya algoritma Halfbyte.. tapi di programku, Halfbyte aku modifikasi sedemikian rupa sehingga cocok buat data SMS.
Perlu diketahui bahwa karakter GSM rada beda sama karakter ASCII – toh karakter GSM sama dengan yang dipake di CDMA kok.
Algoritma yang aku hasilkan itu tak kasih nama “Expanded Halfbyte” cie…. Hehehehe..

It is called Hlafbyte algorithm.. But in my program, I modified it so it can be fit with SMS data type.
GSM characters are a bit different with ASCII.
The new algorithm that I modified from Halfbyte, I called it “Expanded Halfbyte”

Modifikasinya yaitu :
Penciptaan byte awal, mengingat pemotongan byte terkompresi tu tiap 4 bit, jadi ada kemungkinan terjadi untai yang bukan kelipatan 8,
jadi disesuaikan dulu.
Penyesuaian dengan karakter GSM.
Yeah, itu penjelasan yang aku rasa paling mendekati tentang apa yang aku buat, hehehe.

The modification are :
Adding starter byte, because I cut the byte per 4 bit, so it is possible that the result string cannot be divided with 8, as supposed to be.
Adjustment with GSM characters.
Maybe those are the best explanation about what I’m doing.

Klo mau programnya, silakan aja

If you’d like to get it, so please click :

download di sini gratis : http://rapidshare.com/files/132871385/Kompresi_SMS.zip.html
atau disini : http://www.geocities.com/winartan_angkin/Kompresi_SMS.zip

Adapun gambaran programku :

Software description :

Berat : 60 Kb doang
Syarat :

  • Hape yang support java MIDP 2.0 & WMA (udah download aja, perkara gak jalan berarti gak bisa, gt aja, hehehe)
  • Untuk bisa kirim SMS terkompresi, hape penerima juga harus memiliki program ini. (To be able to send compressed SMS, receiver’s cellphone should also install this first)
  • Untuk nerima SMS terkompresi, program ini nggak perlu nyala,
    jadi klo ada pesan terkompresi masuk, otomatis nangkep sendiri kok. Jadi programnya mati pun diSMS tetep bisa (gak harus standby nyala terus). (The program doesn’t have to run all the time, it can automaticaly run when a compressed SMS received)

Feature :

  • Send Message + kompres/dekompres
  • Inbox
  • Sent Items
  • Contacts (tetep bisa akses kontak dari hape juga)
  • Archives

notes : berhubung gak gitu serius bikinnya, mungkin masih ada bug… tapi mungkin juga enggak.. kekekeke. OK, silahkan

There might be bugs in the program, as I’m not so serious when making it..
Please feel free to download it

download di sini gratis : http://rapidshare.com/files/132871385/Kompresi_SMS.zip.html
atau disini : http://www.geocities.com/winartan_angkin/Kompresi_SMS.zip

Helloworld

Posted: July 11, 2008 in Life
Tags:

Ini post pertama, di wordpress…

Jadi deg-deg an…. ( berlebihan deh )
Karena bingung mo nulis apa…. tidak ada pilihan lain selain menulis semua karakter ASCII :

 !”#$%&'()*+,-./0123456789:;<=>?@ABCDEFGHIJKLMNOPQRSTUVWXYZ[\]^_`abcdefghijklmnopqrstuvwxyz{|}~
????????????????????????????????¡¢£¤¥¦§¨©ª«¬­®¯°±²³´µ¶·¸¹º»¼½¾¿ÀÁÂÃÄÅÆÇÈÉÊËÌÍÎÏÐÑÒÓÔÕÖ×ØÙÚÛÜÝÞßàáâãäåæçèéêëìíîï
ðñòóôõö÷øùúûüýþÿ

Hore….. gw nulis semua karakter ASCII….. lol

hm….

Gw heran, kenapa gw nulis karakter ASCII ya…